As promised, Cooking Ripe! has a new and improved site! Please visit us at: http://cookingripe.com/


As promised, Cooking Ripe! has a new and improved site! Please visit us at: http://cookingripe.com/
 Cooking Ripe! has moved to: CookingRipe.com – please join us on the new site!
Cooking Ripe! was launched in late August of 2012 and has had just under 3000 views so far. It’s been very exciting to get to share my garden-to-table recipes with so many people in such a short time. I’ve been learning a lot about this whole food blogging business and I am ready to take things to next level!
Coming in 2013: Cooking Ripe! will be moving to a new hosting site where we’ll have our very own domain name: CookingRipe.com. YAY! Our very own dot com address. Legit, right? With this change, you’ll notice that the blog will undergo some spiffing up and will get a new overall look. I hope to make it a little more user friendly by adding some slick tools that will make things like recipe printing and pinning a little easier. We’ll likely have a little downtime while we complete the migration process, but don’t worry – I’ll give you plenty of warning when it’s time. Stay tuned for more details on the New & Improved Cooking Ripe!
Tops in 2012: In our few short months online, I’ve had great traffic and feedback on the blog posts. Below is a list of the five most viewed posts on Cooking Ripe! in 2012. Have you tried all of these yet? If not, you better get cookin!
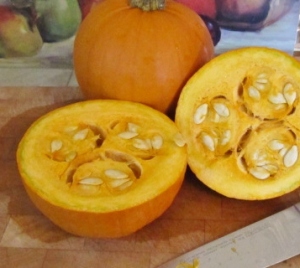
1. The number 1 most viewed post on the blog is Homemade Pumpkin Puree. I had a whole crop of volunteer pie pumpkins in the garden this year, so I had to learn to make my own puree. I’ll never go back to canned! It tastes so fresh and it’s so versatile. Try the many other Cooking Ripe! pumpkin recipes, too.
2. The runner-up as the most viewed post is the Carrot and Sweet Potato Soup. I LOVE soup and LOVE orange food, and apparently my readers share my love of soup and orange since it was the second most popular post. This is a simple and creamy cold weather soup with a little ginger kick. Check out the other Cooking Ripe! soup lover recipes.

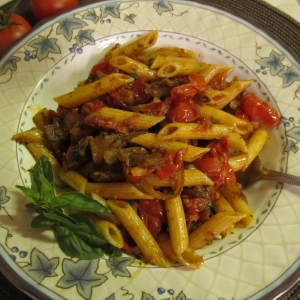
3. Number 3 is my personal favorite, as you can tell by its title: Roasted Eggplant and Tomato Pasta – the BEST pasta you’ll ever eat! Really. You have to try this recipe if you haven’t yet. I got an eggplant in my Bountiful Basket last time and I am thrilled to get to make this recipe again this week. The Hubs doesn’t even mind repeats of this one!
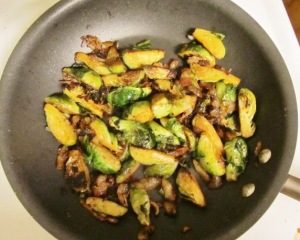
4. One would assume this next post would have been number 1 since it includes BACON! and everything is better with bacon, right? Caramelized Brussels Sprouts – with BACON! I try not to cook or eat it very often, but once in awhile you gotta live, right? Brussels sprout lovers and haters can unite to love this recipe, I promise!
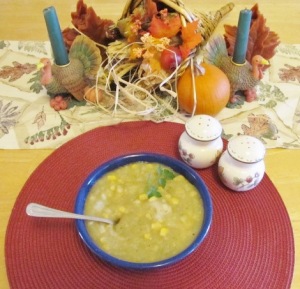
5. Last, but certainly not least in the round-up of most viewed posts is the Southwestern Green Chile and Corn Potato Chowder. Yes, another soup made the list! This one is creamy and spicy without any heavy cream at all. This is a great recipe to use up your preserved roasted green chiles and warm up on a cool night.
Remember, you can go to Cooking Ripe’s Recipe Index for a complete list of all of the recipes. Also, if you haven’t joined me on Pinterest yet, it’s high time! And, finally – like Cooking Ripe! on Facebook to stay up to date on all blog updates and other tasty tidbits. Stay tuned for a great new year of growing and cooking!
Thank you all for your support. Cheers to a delectable 2013!

Cooking Ripe! has moved to: CookingRipe.com – please join us on the new site!
I do a little holiday baking, but I have never attempted to make holiday candy, except for fudge. I remember my mom making divinity and date roll when I was growing up, but I never really learned to do it on my own. This year I got a hankering for the date roll I had growing up and started digging through mom’s old cookbooks looking for the recipe. Well, I found it, but it was actually just tucked into her very tattered Joy of Cooking circa 1943.
Inside an envelope that says, “It was in the electric frying pan book” I found a very old parchment-like sheet, folded into fourths with a pencil written recipe for date roll. Score! I have no idea who wrote on the front of the envelope, as it’s not my mom’s handwriting and I’m not sure who wrote out the recipe, but I’m guessing it was my grandmother. Clearly, it is very old and starting to deteriorate, so I’m really glad I found it when I did. 
If you haven’t had date roll candy, it may sound odd, but it’s really good, I swear! I guess I don’t think about eating dates very often, but they’re actually pretty tasty. My mom really liked them and I remember her affinity for date shakes that she would get when we stopped off at the Date Tree, a famous road stop on California’s I-80, on our way to visit her best friend in Sacramento. While you do taste the dates in the candy, it’s also very sweet, like fudge, so it’s definitely a confection. It also has walnuts to give it some crunch. If you like fudge, you will probably like date roll.
I had to try the old recipe and see if I could make it work. Grandma’s recipe was a little vague. The list of ingredients says:
I had to assume that a package of dates in grandma’s day and a package in 2012 are probably not the same quantity. My package was 8oz. I also wondered about the milk. I use skim milk at home, but wondered if whole milk or some other variety might be better for this recipe. So I did a little internet research and found a recipe that used almost the same ingredients, but the quantities matched my 8oz package of dates, so I used those measurements instead. The other recipe also included butter, but grandma’s doesn’t. I looked at several date roll recipes and most seemed to have butter, so I figured I would go ahead and add it. I have to assume it would have been ok without it since the old recipe didn’t call for butter.
Here’s how I made it:

Following the original recipe’s instructions to “cook sugar, milk and dates until they form a soft ball in cold water (stirring while cooking)” I put the first three ingredients into a heavy saucepan and turned the heat to medium until the sugar dissolved.

I don’t know much about the rules of candy making, but fortunately I have my mother’s candy thermometer. It has lived in my utensil drawer for over 10 years now and I have never used it, so I hoped it still worked. I attached it to the pan and turned the heat up to medium high and stirred and stirred. After probably 5-7 minutes, it reached the “soft-ball” temperature on the thermometer.

That’s my mom’s really old, long-handled wooden spoon stirring the candy
Grandma’s directions then say, “Take from fire, add the nuts and vanilla and beat till very thick” so I removed the pan from the burner and added the nuts vanilla, and also the butter. I stirred it all together. It was quite thick and sticky.
Grandma then tells us to “Have ready a cold wet cloth, pour mixture onto cloth and roll up till cold.” I remember the rolled up candy in cloth in the fridge when I was a kid, so I knew what to do there, though I still don’t know why, exactly. The Hubs wondered into the kitchen when I was embarking on the project and proclaimed that he knew all about date roll, too, because his grandma made it, too. He asked if I had my cold cloth ready. I did! I ran a tea towel under very cold water, rung it out and laid it out on the counter to be ready for the rolling step. Once the candy was cooked, I carefully scooped it out of the pan onto the cloth, along the edge.
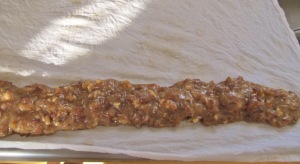
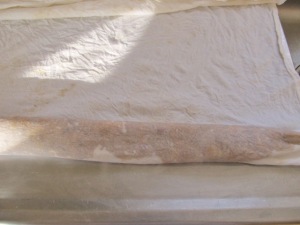
Then, I rolled it up and put it in the fridge to harden over night.

In the morning, I unrolled the snake-like affair and sliced off a piece to taste. Bingo, there it was! The familiar sweet date flavor from my childhood! Success!
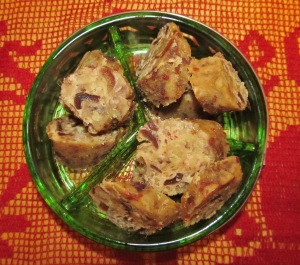
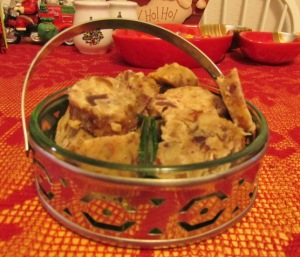
The candy sits nicely in mom’s Depression-glass candy dish
Grandma’s Old-Fashioned Date Roll Candy
Ingredients:
Directions:
Cooking Ripe! has moved to: CookingRipe.com – please join us on the new site!
This post is dedicated to my best friends: my Basset Hounds, Daisy and Lola. They have become more than the family dogs; they are our children. They were both rescue dogs who found their forever homes with us and have lived long and happy spoiled lives with our family. Sadly, with long lives comes geriatric health issues. In mid-November, Daisy was diagnosed with Lymphoma and is not expected to have more than a few more months with us. While we were still adjusting to that sad news, Lola was diagnosed with a liver condition and she declined very quickly, so we said goodbye to her just last week.

Lola

Daisy
So, in their honor, I write this post about making their homemade doggie treats. I make these about every two or three weeks and have meant to post the recipe and pictures, but just haven’t taken the time until now. I started making these when we realized that our cheaper dog food and treats were causing some digestion issues for both dogs, but especially Lola. I started reading about and buying healthier grain-free foods for them and then I found some recipes for dog treats and figured that if I made them, I would know what was in them and it would likely be less expensive than the store-bought fancy kind.
I use a version of the Woofies recipe found on the Kitchen Muse blog. I add carrots and usually use about 1/2 white and 1/2 wheat flour. I have also used mashed sweet potatoes and spaghetti squash in place of the pumpkin when I had those leftovers. Dogs can eat many of our household veggies and fruits, but be careful as some are not safe. According to WebMd, we should NOT feed our dogs the following vegetables or fruits:
On the safer side, we can share these:
Here’s how to make All Natural Dog Treats:
Since I do this every two weeks, I’m not fussy about ingredient amounts and I don’t worry about presentation (no, I don’t have the bone-shaped cookie cutter!). I’ll show you my no fuss, simple method.
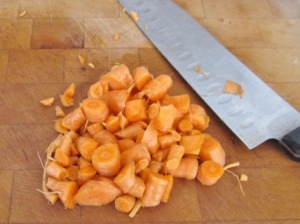
Roughly chop up a couple of carrots. I was using up some late garden baby carrots, and left the peels on and some of the stringy roots because the hounds don’t care :).
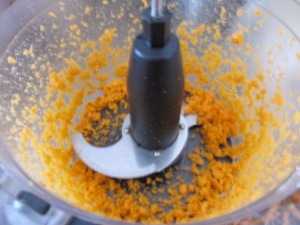
Spray your food processor bowl, lid, blade, etc. with some non-stick cooking spray. This is a sticky dough so this helps with cleaning up. Throw the carrots in the food processor with the blade attachment and give it a whirl or three. Alternately, you could grate the carrots for a finer consistency if you’re not sure your pooch is a carrot lover.
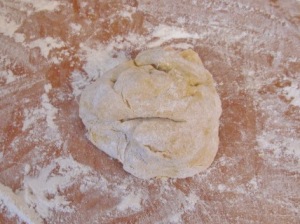
Dump in the rest of the ingredients and turn on the processor and let it go until you have a soft dough ball. If it’s looking more wet and sticky than doughy, add more flour. If it’s super stiff, add a little more pumpkin or some water. You want to end up with something a little firmer than pie dough because you’re going to roll it out and don’t want it too sticky.
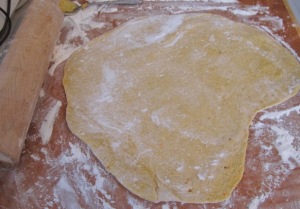
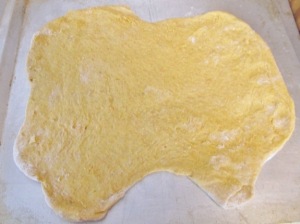
Flour your workspace and roll out half of the dough. I don’t care if it’s symmetrical, I just care that it fits on the baking sheet. I learned that it’s easier to cut it into smaller pieces after I move it to the baking sheet.
Then…..(I think I’m pretty genius to think of this one) I use a pizza cutter to slice it up into bite-sized pieces. Brilliant, right? Again, I’m so not fussy about size and shape – and neither are the pups. I don’t spread out the pieces or anything because they don’t really expand in the oven.
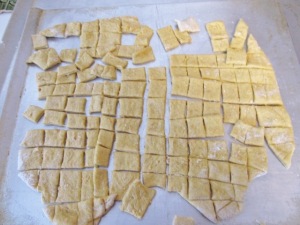
I pop them in the oven for about 45 minutes. They are done when they are pretty hard. If they are softer, they won’t last in a container on the counter as long. If you cut yours larger, they may also take longer to harden. Admittedly, this batch went a little too long because I got distracted and left them in a little long, so they’re a little darker than usual. Daisy said she didn’t mind.

Let them cool, snap the pieces apart and toss into a jar and you and poochie are all set!
All Natural Dog Treats:
Ingredients:
Directions:
1. Preheat oven to 350 degrees. Spray food processor parts with non-stick spray for easier clean up later.
2. Rough chop carrots, then place in food processor with blade attachment. Whirl for a few seconds until carrots are finely diced.
3. Add the rest of the ingredients to the food processor and process until a firm dough ball forms. Add flour or pumpkin/water to mixture as needed to get to the desired consistency.
4. Place half the mixture on a well-floured surface, then roll out to about 1/2 inch thickness. Transfer rolled dough to a baking sheet. Use a floured pizza cutter or sharp knife to slice the dough into about 1 inch pieces.
5. Repeat with the second half of the mixture, placing onto a second baking sheet.
6. Bake for about 45 minutes until pieces are hardened. Cool, then snap pieces apart and place in air-tight container.
Your pup will ADORE you even more now! Mine know when I’m making these now and hover about my feet while I’m mixing up the dough. Lola used to be against carrots, but once she got used to the carrots in the treats – because they were TREATS – she decided she liked them and I added them periodically to her food, too. Pumpkin is good for digestion – in people and dogs – so if your pooches have delicate stomachs, these treats may help settle them when they get indigestion.
For other doggie treat recipes, check out my “Doggies” board on Pinterest.
Related Posts:

Cooking Ripe! has moved to: CookingRipe.com – please join us on the new site!
One of my favorite ways to prevent food waste, save money and improve the nutritional value of my recipes is to make my own homemade vegetable stock. If you’re like me, you buy cans or cartons of veg and/or chicken stock to have on hand to make soup, stews and other recipes. I like to use both in place of water to add flavor to all sorts of thing including rice, quinoa, potatoes and other veggies and when cooking meat. But, it seems that a lot of those prepared stocks contain loads of sodium and a lot of those other unpronounceable chemicals so they’re not as wholesome as we might think. Yes, there are some nice organic varieties, but they are usually pretty spendy, so why not make it a home using our own leftovers?
It’s so simple, I can’t believe I wasn’t doing it sooner. I wish I could take credit for the simple idea, but I learned it from this post on Simple Bites. I follow her quickie version and make a new batch of stock about once a month.
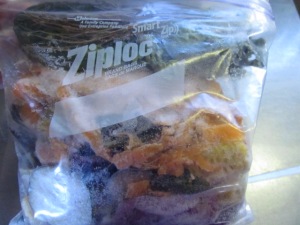
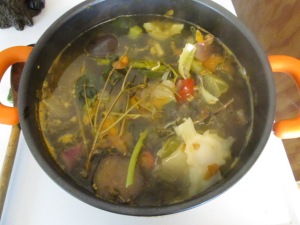
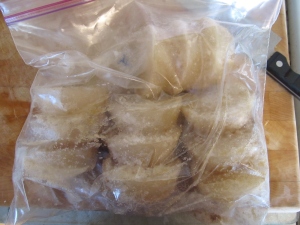
I compost a lot of my kitchen waste, but sometimes my compost pile can’t keep up with my new scraps, so I learned to keep some large freezer bags in my extra freezer. Each time I cook and have some veg scraps, I set them aside as I’m chopping and cooking, then I throw them in the freezer bag. I usually wait until I have about three full bags and then I split the scraps between two of my dutch ovens. I fill the pots with water and then bring to a boil, then simmer on the stove for about an hour or so.
After the stock cools, I strain it using coffee filters in my colander (cheesecloth also works) and then container it for the freezer (and I must reserve some for pouring over the Hounds’ food, also).

This is Daisy, my best sous chef
Since I use different quantities of stock for various recipes, I freeze it in a variable quantities. I have used ice trays for when I need just a little stock, like to saute some veggies or to add a few spoonfuls to sauce or gravy. I also use muffin tins to make cup sized quantities. I use those to add to rice, quinoa, couscous, and some pastas.
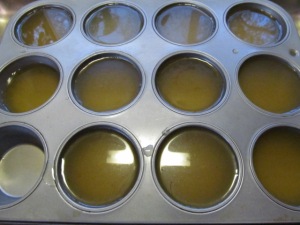
Finally, I freeze larger quantities in quart-sized mason jars, or large plastic yogurt containers (usually about 32 oz). The larger quantities are perfect for soup and stews and anytime you want to boil something but add more flavor than using plain water. I LOVE making mashed potatoes by boiling the potatoes in veg stock or chicken broth. All kinds of extra flavor! When I use the ice cube trays or muffin tins, I freeze in the trays then pop them out and put them all in a large freezer bag. Then I just grab a hunk of stock from the freezer as needed.
What kind of scraps to save for stock:
I try to ensure that I end up with a good variety of veg parts when I put them into my pots to boil, so if one vegetable is a little bitter, like eggplant, another one will balance it with some sweetness, like carrots or sweet potatoes. The addition of leftover herb stems really pumps up the flavor of the stock like no store-bought kind you’ve had. I also personally like to ensure there are some tomato and potato parts in my stock – I’m not sure why, but I just think the stock needs those basic flavors.

Tomato canning waste made a nice stock ingredient
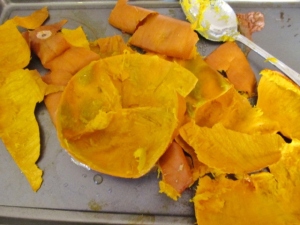
Leftover parts from roasted pumpkins went in my stock recently

Inner strings and seeds from roasted acorn squash is now veg stock
The boiled waste can still be composted, if desired, so you’ll be getting double duty from those scraps – cool, right?
I hope you’ll give the homemade stock trick a try. It really doesn’t take much extra time because you can boil it while you’re doing other kitchen duties, then you just have to strain and store it. If you’re anything like me, you’ll get a little charge out of making it yourself instead of buying it because you’ll know exactly what’s in it and you’ll know you took a little time to make something healthy and yummy for your family.
Related Posts:
 Cooking Ripe! has moved to: CookingRipe.com – please join us on the new site!
 Tis the season for over indulgence so it’s really hard to remember to eat some healthy food occasionally. It’s also really tough to slow down long enough to make a balanced meal. But, with a little planning and some simple recipes, we can maintain some semblance of a healthy diet through the holiday season. Really! Here’s an easy dressing recipe to make and use all week long.
I always thought there was some sort of secret voodoo involved in making fresh salad dressing. I don’t know why I thought it was difficult, but it seemed like something that was unnecessarily complicated when there’s an entire aisle in the grocery store devoted to the bottled stuff – and a lot of healthy bottled varieties at that. My opinion on those bottled dressings totally changed this summer when I started trying some homemade dressings.
I had such a bumper crop of fresh lettuce I HAD to get creative with it. I figured I couldn’t afford to buy a bunch of different dressings to top our plethora of greens, so I better learn to make some homemade versions. I also had some fresh herbs from the garden and also from my Bountiful Baskets, so I decided to dive in and give it a spin. I’ll never go back. Well, I tried when I was too lazy to make some dressing for a salad one night. YUCK. It just is not the same. All those…extra preservatives really do change the flavor of the whole salad.
One of my favorites this Martha Stewart recipe for Fresh Italian Dressing. I keep the basic recipe, but fiddle with the herbs and the amounts a little. The trick is in the preparation, which isn’t hard, but just something you may not know if you haven’t made your own dressing before.

Here’s how:
Gather your ingredients, so they’re all handy to make the process super quick. Start by chopping your garlic and fresh herbs. The original recipe calls for basil, oregano and marjoram. I never have fresh marjoram, so I use thyme instead. I would imagine that any kitchen herb, except maybe mint or cilantro, would work with this dressing, so don’t worry if you don’t have exactly these herbs. Can you use dry herbs instead of fresh? Sure, but use one teaspoon of dried herbs for one tablespoon of fresh herbs and know that it may not end up with the amazingly fresh taste that the fresh herbs create. Still, it will be better than the bottled stuff, so go for it. As always, I’m not that precise in my measurements with the herbs and it doesn’t seem to matter.

Left to right: thyme, garlic, oregano, basil
Next, whisk the vinegar with the garlic, sugar, mustard, pepper flakes and salt & pepper. Let’s pause and talk about the whisk itself. I bought this cool springy whisk at a yard sale recently and it’s quickly become one of my favorite kitchen tools. It is the perfect thing to get a great emulsification going with a salad dressing.


In a separate bowl, whisk the two oils together. I always feel like it’s more oil than I need, so I have cut down on both by equal amounts and it’s worked out fine, also.

Vinegar mixture on left; oil mixture on right
Ok, here’s the part you want to pay attention to because it’s the one critical step! Emulsification. Martha explains that’s when you suspend the oil in the vinegar. This happens when you slowly add the oil into the vinegar while you whisk away. If you just dump, it won’t do that suspension thing, so take a minute and slowly pour and whisk and then BAM! Emulsification happens!

Finally, whisk in the herbs and viola, it’s dressing! I like to let it sit for a few hours, if possible, before serving because it allows the flavors to develop more completely.

I make dressing so often now that I invested in this little cruet that I found on Ebay to store it. Isn’t it cute?
Homemade Fresh Italian Dressing
Yield: about 1 1/3 cup
Ingredients (directly from original recipe):
Directions:
Serve immediately, or let sit for a few hours while flavors marry. Refrigerate for up to one 1 week (I have gone longer, but that’s Martha’s suggested shelf life). Be sure to give it a vigorous shake before serving.
Notes for next time:
As I mentioned above, I use less oil than called for and it works out fine. If you don’t think you’ll use up the dressing within a week, try halving the recipe. I have also added a little lemon juice to brighten it up a bit. I think I tried balsamic vinegar once and it was also very good. Otherwise, I really like this dressing as is.
The fresh herbs with the oil and vinegar really are so spectacular. You won’t believe how much tastier your salad is with a fresh dressing on top. I also like to use Italian dressing when cooking veggies. Instead of just drizzling in some olive oil when sauteing or roasting, drizzle on this dressing for more flavor. Imagine tossing some fresh tomatoes in this dressing and then roasting it in the oven. Oh my!
See my Dips, Dressings and Sauces board on Pinterest for more fresh dressings.
Related Posts:
Cooking Ripe! has moved to: CookingRipe.com – please join us on the new site!

When I go out to dinner, I ALWAYS order seafood – usually shrimp. When I was a picky-eater kid I drove my parents bananas when we went to a restaurant because I didn’t like any of the “grown-up” food. Like all bad normal parents, they would sometimes default to ordering me a plate of french fries for dinner. But somewhere along the way, mom or dad had a brainstorm and ordered some fried shrimp for me to try. Turns out, fried shrimp was not so far from french fries and I liked it! Ah… parental bliss. The kid can eat shrimp everywhere we go now – and I did! And I still do, only now I don’t order the battered and fried stuff (ok, maybe once in a great while when I’m really hungry and there’s no other seafood option). I love it prepared pretty much any which way: baked, broiled, grilled, raw, boiled, sauteed, stuffed, and I like it over pasta, in salad, barbecued, with rice, in tacos, in soup, with steak, with cocktail sauce – or any sauce! So, I kinda adore shrimp.
It’s also pretty easy to cook – and not horrendously expensive if you buy the frozen kind which works fine for most recipes. I know, fresh is better, but here in my land-locked state of Colorado, out in the middle of nowhere, fresh is just not happening.
BUT (there’s always a but, right?), the Hubs doesn’t adore shrimp like I do. Something about it can’t be touching any other ingredients or food because he says it makes everything else taste fishy. What? *rolls eyes* He will eat shrimp cocktail, shrimp scampi (no noodles, just shrimp and a gallon of butter) and the deep fried variety of my childhood. This causes me heartburn because I could eat it daily, but that would mean I would need to prepare two dishes – or two versions of the same dish, which I do occasionally.
So one day last week I was surveying the options in the freezer and spied a bag of shrimp that had been there for over a month. Hmm…I thought, I bet if I just prepared it right, he’d like it and then we could move on and have shrimp everyday. I decided to go for it. Since he likes scampi, I thought maybe I’d try something along those lines. I had a beautiful picture of a shrimp dish on my seafood Pinterest board that I took for my inspiration. The recipe, Roasted Tomatoes with Shrimp and Feta from Real Simple is actually really simple and the picture made me want to lick the computer screen. He HAD to love it, right?

Here’s what I did:
Clean, de-vein and remove the tails of 1 pound of shrimp. Mine were the 51-60 size, but use any size you like. Chop up about half an onion, about 1/2 a bell pepper and about 5 small tomatoes (mine are plum size). Chop up some marinated artichokes, also. Toss the veggies, along with a few cloves of garlic, in a few healthy glugs of extra virgin olive oil and spread out in a glass baking pan. Season with salt and pepper.

Bake for about 20 minutes, until the veggies are nearly finished, then stir in the shrimp, another healthy squeeze of lemon, the parsley and feta. Cook another 10 minutes, or until the shrimp are pink and firm.


I simply served it over some leafy green lettuce with some warm crusty bread. DONE! So simple and yet so amazingly delicious. I really thought is was restaurant-worthy, and remember, I’m an expert. It’s rich and filling, while being a light dish. I was stuffed when I finished my plate. So, I know you are dying to know if I was able to lure the Hubs over to team shrimp-lover. Well…mission not quite accomplished. He was dismayed when he saw the mixture of shrimp and other ingredients all together on the same bed of lettuce. To his credit, he ended up eating most of the shrimp, but wasn’t able to eat the veggies or lettuce – because it might have tasted “shrimpy.” You can’t win ’em all. I didn’t take it personally since I knew going in he was shrimp-phobic. I tried.
However, I LOVED it and I’m sure the daughter, a fellow shrimp freak, will love it, so I’ll make it for her sometime when we have a girls’ night. If you love shrimp, this recipe is for you and it is fit to serve to company as either a main or side dish. It goes together super fast and there’s plenty of room for versatility and creativity.

Roasted Shrimp and Vegetables
Servings: 4-6
Ingredients:
(This is not a fussy recipe; use ingredients you have and enjoy)
Directions:

Notes for next time:
This is another very versatile dish. You could really use whatever veggies you have on hand – broccoli, Brussels, squash, etc. It would be super pretty to use multiple bell pepper colors. You can also play with the spices – the addition of more Italian flavors seems logical – and some pesto would also be nice. I didn’t spice it up much, since I was trying to convince the Hubs to like it and I sometimes overheat things for him. That said, for me, I would add the red pepper, or maybe some chili powder. This could also go more Mexican flavor with some green chiles and cumin with some chili powder. Or, go Asian with some Chinese five-spice, ginger, green onions and bok choy (YUM – going to try that). Instead of serving over lettuce, it would also be super spectacular over pasta or rice. It makes its own sauce, so it’s ready to add to anything, really.
Leave a comment letting me know how you liked it and how you tweaked it!

Related posts:
 Cooking Ripe! has moved to: CookingRipe.com – please join us on the new site!

The ghosts and goblins have retired for another year, but I bet you still have some sweet pumpkins hanging around the house or you have some frozen or canned pumpkin puree. If you’ve got some puree on hand, this is a super fast, super easy, and super flavorful meal the whole family will adore. You can make it as spicy as you like – or not – and you can get it on the table in a flash! Oh, and the nutritional content is simply amazing: all sorts of fiber from beans and pumpkin, lots of vitamins and it’s very low carb and low fat!
I promise (fingers crossed behind my back) this will be the last pumpkin recipe I’ll share – for a little while, anyway. I have almost used up all of my pumpkin from my little patch, so I actually bought four more little sweet pumpkins during the after-Halloween sale because I just can’t get enough! The Hubs rolled his eyes when we saw the new ones arrive from the store. “Oh… more pumpkin,” he said less-than-gleefully. Whatever. I love the stuff, so I’m going to keep roasting, pureeing and putting it in anything and everything. Hands up if you’re with me!

You might think that a pumpkin burrito would be sweet – which it could be if you made it that way – but these burritos are savory and spicy and definitely not reminiscent of pumpkin pie. I got the idea when I had a pumpkin burrito at a local hole-in-the-wall Mexican kitchen in Durango where the daughter now lives. It was pretty simple: pumpkin and green chile, so I thought I’d whip up my own version of it at home.
Here’s how:
It’s really simple if you have some puree and some rice ready. I swear it was ready in about 15 minutes. I use a rice cooker, so I made some short grain brown rice earlier in the day. Then, simply saute the onions until translucent, then add the garlic and cook for a minute. Finally, add the rest of the ingredients to the skillet and cook over medium-low heat until hot throughout. If you let it sit a little while, the flavors will improve, but if you need to get the troops fed, just move it along. I decided to crisp the burritos in a little canola oil – not a total deep fry – to add a little crunch, but you could serve the burritos soft or you could pour some red or green chile enchilada sauce over the top for an “enchilada style” burrito.


Pumpkin, Rice and Bean Burritos
Servings: 4-6
Ingredients: (don’t be fussy about the ingredients; play around with the flavors to suit your tastes)
Directions:

These are pretty spicy, so dial back the chipotle and green chiles if you’re not a heat freak like me – or if you’re serving small children. The Hubs said they were a little too spicy for him, but it was just right for me. He would have enjoyed some meat, like ground beef, in his but overall gave the meal a thumbs up. He was surprised to learn that one of the main ingredients was pumpkin since it just takes on the flavors of the other ingredients.

Notes for next time: this recipe is so versatile that the possibilities are endless – really. You could add some cooked meat, as the Hubs suggested: beef, pork or chicken would work. You could also use a simple taco seasoning combo instead of the spices listed above. Of course, you could use other types of beans – or a combo of more than one type. I might add some enchilada sauce inside the burrito, too. To increase the veg content, I might add some corn or spinach. Basically, anything you’d do to any other burrito, you could do here. I also think the mixture would be awesome as a tostada topper, too! PS: this stuff is even better the next day for a leftover lunch. Mhmm.
I’d love to hear your variations on this simple recipe. Leave a comment!
Related Posts:
Cooking Ripe! has moved to: CookingRipe.com – please join us on the new site!
I just wanted to post a quick note to let my readers know that Cooking Ripe! was honored as today’s featured food blog on Foodista.com. This is the first time we’ve been promoted by a site like Foodista, so I’m really excited to get to share my blog with a new and expanded audience. Thanks for featuring us, Foodista!


Cooking Ripe! has moved to: CookingRipe.com – please join us on the new site!
Today was a Bountiful Basket day, which is always a good day. I get so excited to see what arrives on the truck. Today’s haul was really exceptional because it included a few things I haven’t tried to cook with yet: water chestnuts and spaghetti squash. I’ll keep you posted on how those work out, but while I was helping at the pick-up site, I heard several people grumbling that they were not excited about the very large bag of Brussels sprouts we were getting.
Why, oh why can’t we get past the sprout hating, people? Just because grandma boiled them to death and made you eat those slimy things, doesn’t mean they are inherently yucky.
After all, they’re just mini cabbages – do you like cabbage? Ok, if you said yes, then you like Brussels sprouts. The end.
I know my fellow Bountiful Basketeers are scrambling to find recipes to try with their bag o’ sprouts, so I thought I better get this one posted ASAP.
I like Brussels best when they are crispy, and while I have oven roasted them in a few different ways (see Crispy Parmy Sprouties), I haven’t tried them on the stove-top before tonight. Since the oven was busy making a meatloaf (yeah, my carnivorous husband insisted I feed him meat “for a change”), I decided to make some skillet sprouts. I was hoping to attain some crispiness, so I opted for a caramelizing technique…and to do that, I did something I almost never do: I used BACON. Only two strips, though!

The result was just what I wanted: crispy, tasty, salty and savory. Mhmmm…I can pretty much guarantee that your whole family will jump on-board the Brussels flavor train with this recipe. You can’t go wrong when you’re cooking with bacon, right?
Here’s what I did:
Slice up about half an onion – more or less to suit your tastes. Place two slices of bacon in the skillet set to medium heat. After it cooks for a few minutes, add the onions. Keep the heat to medium, or medium-low, so they don’t cook to fast.

Quarter the Brussels by slicing them lengthwise. I started with about 10 large sprouts.

When the bacon is cooked through, but not crispy, remove from the skillet so it doesn’t overcook. Chop it up to add back to the skillet later.
Add the quartered sprouts to the pan and continue cooking on medium-low heat. Depending on how much bacon grease remains in the pan, you might need to add some extra virgin olive oil to the pan. My bacon wasn’t very thick, so I needed to add a good drizzle. I probably left my skillet cooking for about 20 minutes. It’s important not to rush the cooking, or they’ll end up cooked on the outside and still hard and uncooked on the inside. Stir occasionally.

Once your onions and sprouts start getting that happy caramel brown color, go ahead and add the bacon pieces back in. Once the bacon is crisp and the sprouts are sufficiently caramelized (dark golden brown), they are done and ready to eat!

Caramelized Brussels Sprouts – with Bacon!
Servings: 4-6
Ingredients:
Directions:

Notes for next time:
The Hubs and I were pretty pleased with how these turned out, so I wouldn’t change much. I did think that it might have been pretty to add some carrots, which would also taste great with bacon and onions. Another idea: instead of bacon, you might use diced ham and make it more of a skillet meal.
Simple, right? I do feel a little bad about the bacon, but it was only two slices – and, honestly, it would have been fine with only one slice. I am pretty certain that even the sprout haters will like this recipe, so give it go and see how it goes over at your dinner table.

Related posts:
See my Brussels Sprouts board on Pinterest for more sprout recipes.